Python Computer Science Databases
Intermediate
80 mins
Teacher/Student led
What you need:
Chromebook/Laptop/PC

Testing and Validation

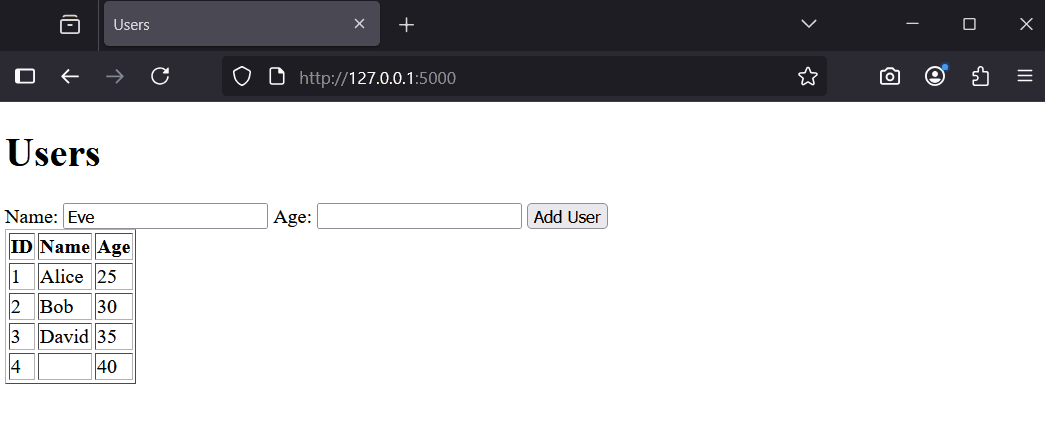
In this lesson, you'll explore the essentials of testing and validation. Learn to build a simple Flask app, test it manually, and add validation to manage invalid data, ensuring your app runs smoothly and handles errors effectively.
Learning Goals Learning Outcomes Teacher Notes

Live Class Feed

This is a live feed of the latest activity by your students on this lesson. It will update in real-time as they work on the lesson.
Load previous activity

    1 - Introduction

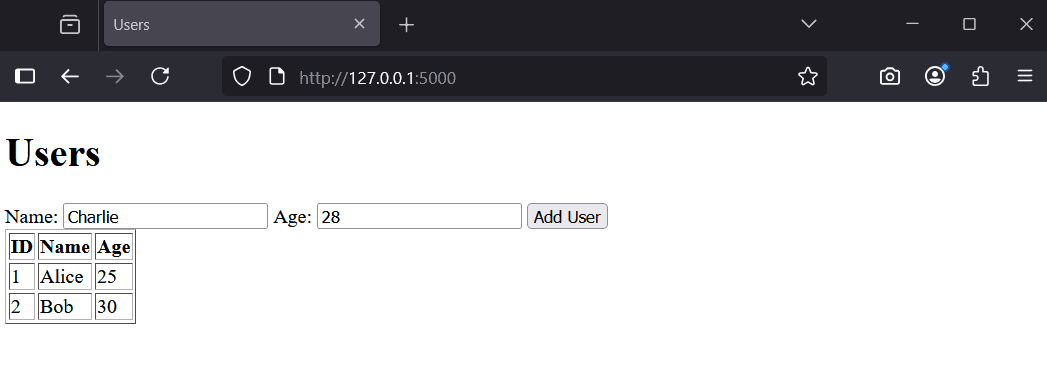
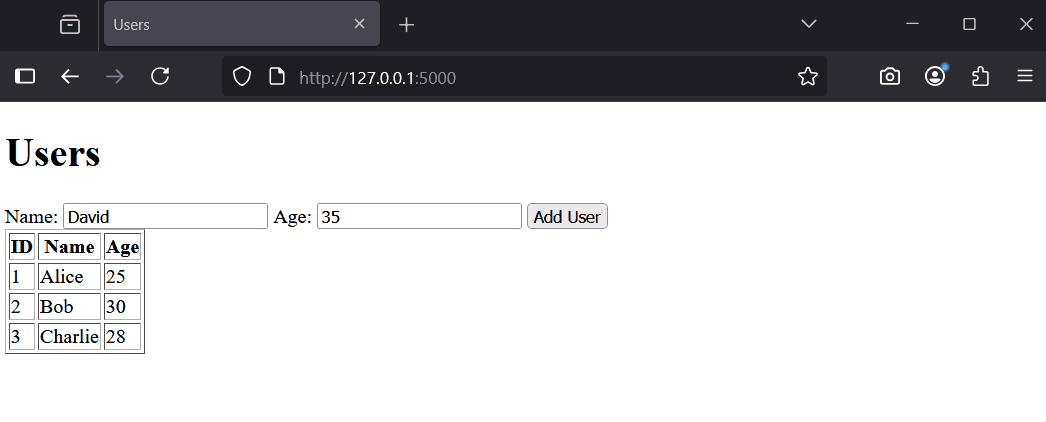
    In this lesson, you will learn about testing and validation. Testing ensures your app works as expected, while validation checks that inputs are correct and safe. You will create a simple Flask app with a form to add users to a database, test it manually, and add validation to handle invalid data.

    By the end, you will know how to perform basic tests, validate user inputs, and ensure your app handles errors gracefully. 

    2 - Set Up Your Project

    First, create a new folder for this lesson's project and set up the environment.

    1. Open VS Code.
    2. Create a new folder on your computer called 'FlaskTesting'.
    3. Open this folder in VS Code (File > Open Folder).

    Next, create a virtual environment.

    1. Open the Command Palette: View > Command Palette.
    2. Type 'Python: Create Environment' and select it.
    3. Choose 'Venv'.
    4. Select your Python version.
    5. VS Code will create a '.venv' folder.

    Open a terminal in VS Code to install Flask.

    1. Go to View > Terminal.
    2. Run: pip install flask.
    3. Wait for the installation to complete.

    3 - Create Sample Database

    Create a sample SQLite database with a 'users' table for this lesson.

    Create a new file called 'create_db.py' in your project folder and add the following code:

    import sqlite3
    
    conn = sqlite3.connect('users.db')
    c = conn.cursor()
    
    # Create table with CHECK constraint to enforce integer type for age
    c.execute('''CREATE TABLE users
                 (id INTEGER PRIMARY KEY,
                  name TEXT NOT NULL,
                  age INTEGER NOT NULL CHECK (typeof(age) = 'integer'))''')
    
    # Insert sample data
    c.execute("INSERT INTO users (name, age) VALUES ('Alice', 25)")
    c.execute("INSERT INTO users (name, age) VALUES ('Bob', 30)")
    
    conn.commit()
    conn.close()
    print('Database created successfully!')

    Run this script in the terminal: python create_db.py.

    You should see 'Database created successfully!' and a new file 'users.db' in your folder. This database has a users table with two sample records.

    4 - Build Basic Flask App

    Now, create a basic Flask app with a form to add users and display them. This will be the base for testing and validation.

    Create a file called 'app.py' and add the following code:

    from flask import Flask, render_template, request, redirect
    import sqlite3
    
    app = Flask(__name__)
    
    @app.route('/', methods=['GET', 'POST'])
    def home():
        if request.method == 'POST':
            name = request.form['name']
            age = request.form['age']
            conn = sqlite3.connect('users.db')
            c = conn.cursor()
            c.execute("INSERT INTO users (name, age) VALUES (?, ?)", (name, age))
            conn.commit()
            conn.close()
            return redirect('/')
        
        conn = sqlite3.connect('users.db')
        c = conn.cursor()
        c.execute("SELECT * FROM users")
        users = c.fetchall()
        conn.close()
        return render_template('users.html', users=users)
    
    if __name__ == '__main__':
        app.run(debug=True)

    Create a 'templates' folder, then create 'users.html' inside it with:

    <!DOCTYPE html>
    <html>
    <head><title>Users</title></head>
    <body>
    <h1>Users</h1>
    <form method="post">
        <label>Name: <input type="text" name="name"></label>
        <label>Age: <input type="text" name="age"></label>
        <button type="submit">Add User</button>
    </form>
    <table border="1">
        <tr><th>ID</th><th>Name</th><th>Age</th></tr>
        {% for user in users %}
        <tr><td>{{ user[0] }}</td><td>{{ user[1] }}</td><td>{{ user[2] }}</td></tr>
        {% endfor %}
    </table>
    </body>
    </html>

    Run the app: python app.py. Visit http://127.0.0.1:5000/ to see the form and users list.

    Try adding a user, like 'Charlie' with age 28. Refresh to see the updated list.


    5 - Manual Testing

    Testing means checking if your app works as expected. We will do manual tests without automated tools.

    With your app running, perform these tests:

    1. Happy Path Test: Enter valid data, e.g., Name: 'David', Age: '35'. Submit. Check if it appears in the table.
    2. Empty Input Test: Leave name blank, enter age '40'. Submit. It adds an empty name – this shows a need for validation.
    3. Invalid Age Test: Enter Name: 'Eve', Age: 'abc'. Submit. The app crashes with a TypeError because age should be an integer.

    These tests reveal issues like accepting invalid data or crashing on errors. Next, we will add validation to fix this.


    Unlock the Full Learning Experience

    Get ready to embark on an incredible learning journey! Get access to this lesson and hundreds more in our Digital Skills Curriculum.

    Copyright Notice
    This lesson is copyright of DigitalSkills.org. Unauthorised use, copying or distribution is not allowed.
    🍪 Our website uses cookies to make your browsing experience better. By using our website you agree to our use of cookies. Learn more