Computer Science
Beginner
240 mins
Teacher/Student led
What you need:
Chromebook/Laptop/PC

Building the Database and Backend Integration

In this lesson, you'll create a database for your interactive information system and integrate it with a backend. Follow steps to review data types, set up your database, insert data, build backend routes, and test everything effectively.
Learning Goals Learning Outcomes Teacher Notes

Live Class Feed

This is a live feed of the latest activity by your students on this lesson. It will update in real-time as they work on the lesson.
Load previous activity

    1 - Introduction

    In this lesson, you'll build on your planning from the previous lesson by creating the database for your interactive information system and integrating it with a backend. We'll review data types and relational databases, then guide you through setting up a database, inserting data, creating backend routes, and testing everything. 

    This lesson ties into the Python Web Backend module, especially the Databases unit. It should take about 180-240 minutes over a few sessions. Remember, your system should meet user needs while using abstraction to organise data efficiently.

    The examples in this lesson will use SQLite and Flask, but you can use whatever database technology you have chosen such as MySQL or Django etc.

    2 - Review of Data Types and Relational Databases

    Let's quickly review key concepts from the Data, Logic and Numbers module and the Databases unit in Python Web Backend. This will help you build a solid database.

    Data Types: In databases, data types define what kind of data a field can hold. Common ones include:

    • Integer: Whole numbers, e.g., for IDs or counts.
    • Text/String: For names, descriptions.
    • Real/Float: Decimal numbers, e.g., prices.
    • Date: For timestamps.
    • Boolean: True/False values, e.g., availability.

    Choosing the right type ensures efficiency and prevents errors.

    Relational Databases: These store data in tables with relationships. Key elements:

    • Tables: Like spreadsheets, with rows (records) and columns (fields).
    • Primary Key: Unique identifier for each record.
    • Foreign Key: Links tables, e.g., a Loan table's UserID linking to Users table.
    • Relationships: One-to-one, one-to-many, many-to-many.

    Here's a simple diagram of a relational database structure:

    Activity: Review your schema. Check if data types match user needs. Consider adding constraints like NOT NULL or UNIQUE.

    3 - Creating the Database

    Now create your database based on your schema. We'll use SQLite as it's lightweight and built into Python, but you can use another database if you prefer.

    If you haven't already:

    1. Create your project folder in VS Code i.e. ALT1Project
    2. Create the virtual environment
    3. Open a terminal and install Flask

    In a new Python file (e.g., create_db.py), set up the database. Here's an example:

    import sqlite3
    
    # Connect to (or create) the database file
    conn = sqlite3.connect('library.db')
    
    c = conn.cursor()
    
    # Create Users table
    c.execute('''CREATE TABLE IF NOT EXISTS Users
                 (UserID INTEGER PRIMARY KEY,
                  Name TEXT,
                  Role TEXT,
                  Email TEXT)''')
    
    # Create Books table
    c.execute('''CREATE TABLE IF NOT EXISTS Books
                 (BookID INTEGER PRIMARY KEY,
                  Title TEXT,
                  Author TEXT,
                  ISBN TEXT,
                  Availability BOOLEAN)''')
    
    # Create Loans table
    c.execute('''CREATE TABLE IF NOT EXISTS Loans
                 (LoanID INTEGER PRIMARY KEY,
                  UserID INTEGER,
                  BookID INTEGER,
                  LoanDate DATE,
                  ReturnDate DATE,
                  FOREIGN KEY (UserID) REFERENCES Users(UserID),
                  FOREIGN KEY (BookID) REFERENCES Books(BookID))''')
    
    # Save changes and close
    conn.commit()
    conn.close()
    print('Database and tables created successfully!')
    Exercise: Create your database file. Run the code to generate the .db file.

    4 - Inserting Data

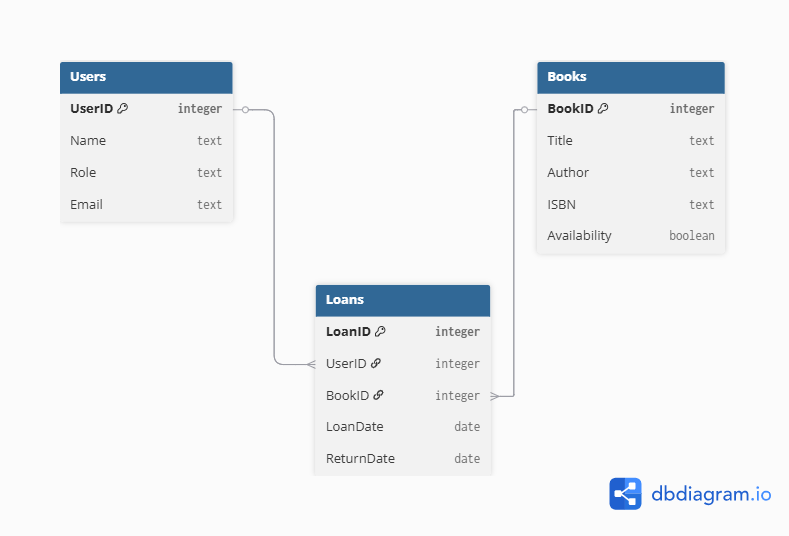
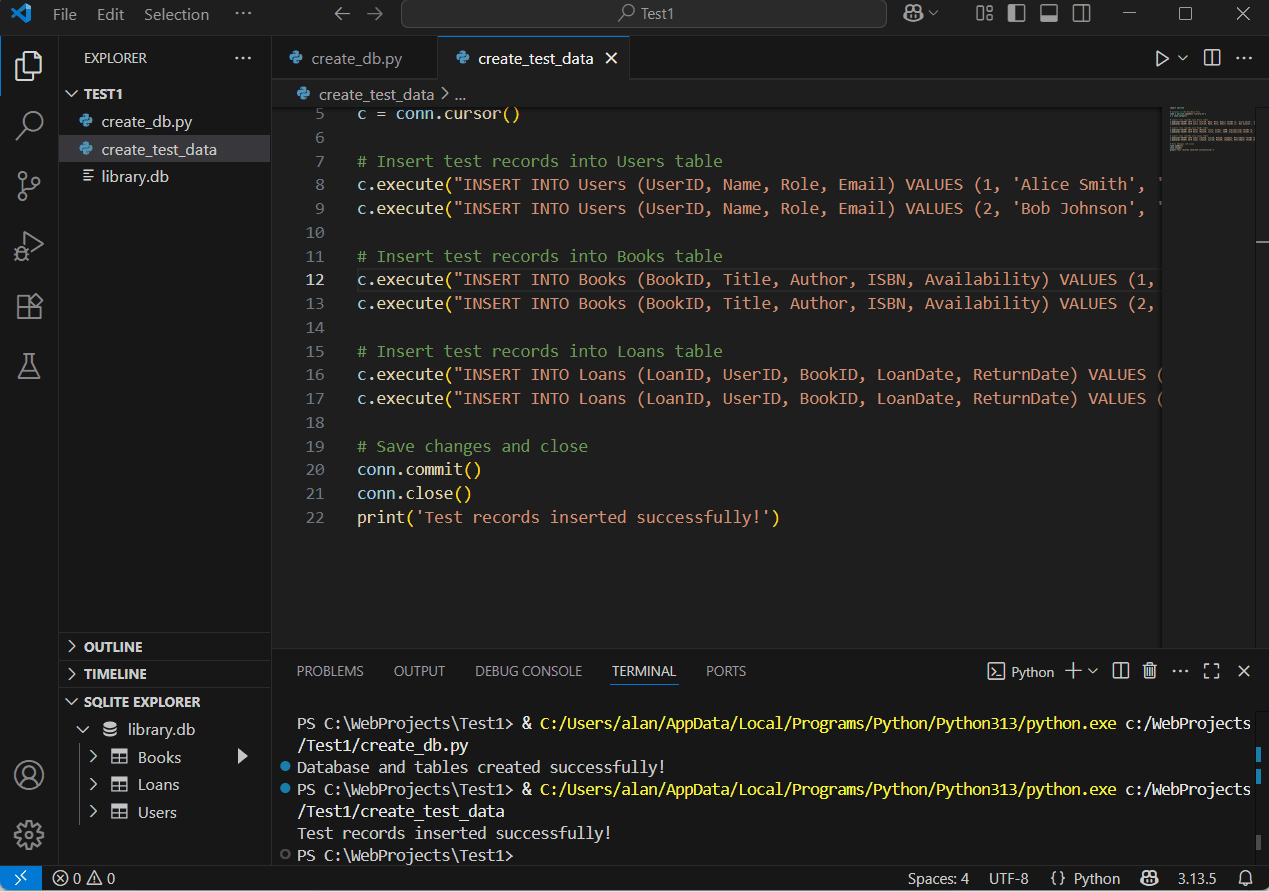
    With the database created, you should insert some initial test data.

    Create a new Python file (e.g., insert_test_data.py) and use a script such as the following to insert the data:

    import sqlite3
    
    # Connect to the database file
    conn = sqlite3.connect('library.db')
    c = conn.cursor()
    
    # Insert test records into Users table
    c.execute("INSERT INTO Users (UserID, Name, Role, Email) VALUES (1, 'Alice Smith', 'Student', 'alice@example.com')")
    c.execute("INSERT INTO Users (UserID, Name, Role, Email) VALUES (2, 'Bob Johnson', 'Librarian', 'bob@example.com')")
    
    # Insert test records into Books table
    c.execute("INSERT INTO Books (BookID, Title, Author, ISBN, Availability) VALUES (1, 'The Great Gatsby', 'F. Scott Fitzgerald', '978-0743273565', 1)")
    c.execute("INSERT INTO Books (BookID, Title, Author, ISBN, Availability) VALUES (2, '1984', 'George Orwell', '978-0451524935', 0)")
    
    # Insert test records into Loans table
    c.execute("INSERT INTO Loans (LoanID, UserID, BookID, LoanDate, ReturnDate) VALUES (1, 1, 1, '2025-08-01', '2025-08-15')")
    c.execute("INSERT INTO Loans (LoanID, UserID, BookID, LoanDate, ReturnDate) VALUES (2, 2, 2, '2025-07-20', '2025-08-10')")
    
    # Save changes and close
    conn.commit()
    conn.close()
    print('Test records inserted successfully!')

    Adapt this script for your own tables. Insert data that matches your user needs, like sample books or users.

    Debugging tip: If commits fail, check for data type mismatches, like inserting text into an integer field.

    5 - Querying the Data

    Now that you've inserted some test data into your database, it's important to verify that everything has been added correctly. You can do this by running SELECT queries to retrieve and display the data. This will help you ensure that the data matches what you expect and that there are no errors.

    If during querying you find that your table structure needs changes, such as adding a new column, renaming a column, or modifying data types, you can use the ALTER TABLE statement to make these adjustments. For example, to add a new column to the Users table, you could run: ALTER TABLE Users ADD COLUMN Phone TEXT;. Be cautious, as some alterations in SQLite may require recreating the table if complex changes are needed. After making changes, you may need to re-insert or update your test data to match the new structure.
    Once you're satisfied that your database is fully created and setup how you want it, you can then look at setting up the routes in your web application.

    Unlock the Full Learning Experience

    Get ready to embark on an incredible learning journey! Get access to this lesson and hundreds more in our Digital Skills Curriculum.

    Copyright Notice
    This lesson is copyright of DigitalSkills.org. Unauthorised use, copying or distribution is not allowed.
    🍪 Our website uses cookies to make your browsing experience better. By using our website you agree to our use of cookies. Learn more